
With the advent of Apple’s new iPad, cross-platform multimedia producers have an opportunity for an additional means of distribution.
Much has been made of the iPad’s functionality, and its limitations. But there’s little actual documentation on the best way to encode for this device, particularly from Apple.
The following steps outline MediaStorm’s compressions settings for web-based iPad playback. That is, this is our best practices for creating H.264 QuickTime files for the web.
To begin, open Compressor.
(Note: If you don’t have Compressor, part of Final Cut Pro Studio, you can also use QuickTime Pro 7, available from Apple for $29.99.)
In Compressor’s Settings window (command-3), click the plus button on the right side. Choose QuickTime movie.

A new custom setting will appear in your window named Untitled QuickTime Movie.
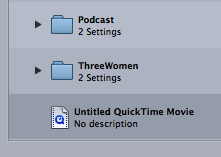
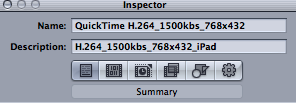
Double click it to open the settings in the Inspector window.
In the Name field, rename the setting. Make sure to include the descriptors QuickTime, H.264, and the file size, and data rate, which we’ll discuss presently.
In the Encoder tab, select the Video: Settings button.
Use the following settings:
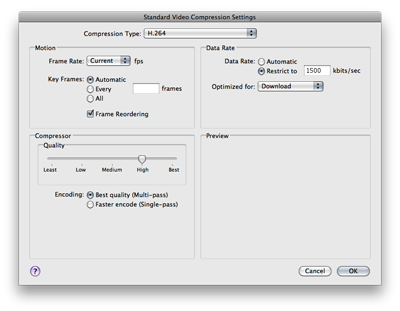
Compression Type:
Chose H.264.
Frame Rate:
Select the same frame rate as your QuickTime file.
(If you are unsure of your frame rate, open your movie in QuickTime Player 7. Open the Inspector window [command-I] and press play. Your frame rate, or frames per second, appears next to FPS).
Key Frames:
Select Automatic and check Frame Reordering. (Technical note: Frame Reordering creates an H.264 Main profile, distinct from the Baseline profile necessary for iPhone encodes.)
Compressor Quality:
Compressor Quality will not be available as you’ll need to restrict the Data Rate.
Data Rate:
Restrict the Data Rate to 1500kbits/sec.
The iPad will playback video up to 2.5Mbps. Increased data rate increases quality, but it also increases file size, which can make for a poor play .back experience.
Based on our testing, 1500kbs is a good compromise.
Optimized for:
Set to Download.
This is the best setting for a progressive download. The file will start playback immediately, rather than waiting for the entire file to download first.
Encoding:
Set Encoding to Best Quality.
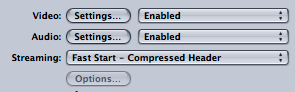
Back in the Encoder tab of the Inspector select the Audio: Settings button.
Use the following default settings:

Format:
Choose AAC.
Channels:
Choose Stereo (LR).
Rate:
Choose 48 kHz.
Render Settings:
Choose Best quality.
MPEG 4 AAC LC Encoder Settings:
Choose a Target Bit Rate of 320.
Return to the Encoder tab of the Inspector.
In the Streaming section choose Fast Start – Compressed Heading. This allows your file to be viewed as soon as it begins to download.
Select the Geometry tab of the Inspector (second from right).
For 16:9 files, type 768×432 in the Frame Size windows. Choose Custom 16:9 from the pull-down window. The iPad can play back files as large as 720p (1080×720). Here too, though, increased dimensions make for larger files and take more time to download.
768×432 is a good compromise and does not look excessively degraded when viewed in full-screen iPad playback.
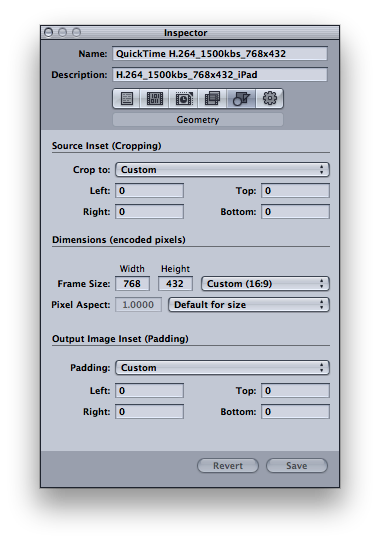
For 4:3 files, type 576×432 in the Frame Size windows. Choose Custom 4:3 from the pull-down window.
For more information on how to maximize your processor speed when compressing, please check out the Qmaster section of the pdf Setting Up Final Cut Pro for Canon 5D Mark II Video on the MediaStorm submissions page. You’ll find additional information on compression there in the resources section.
Additionally, for extensive technical information on the H.264 codec, see Jan Ozer’s streaminglearningcenter.com/ and the white paper Encoding H.264 Video for Streaming and Progressive Download, which helped in the research of this article.
Have iPad encoding tricks you’d like to share? We’d love to hear from you in the comments.
Learn more about our approach to producing multimedia by purchasing MediaStorm’s Post-production Workflow. Spanning more than 200 steps, the workflow covers every phase of editing, from organizing and editing assets in Final Cut Pro 7 through backing up and archiving your project. The workflow includes exclusive access to our Aperture Workflow and our Final Cut Asset Parser. Learn more about MediaStorm’s Post-production Workflow.